Jimmy Boinembalome
Validating requests with FluentValidation
Learn how to effectively integrate and utilize FluentValidation for request validation in ASP.NET Core Web API.

Validation is a critical aspect of any web application, ensuring that the data received from clients is accurate and meets the specified requirements. In ASP.NET Core Web API, there are several ways to perform request validation, and one popular library for this purpose is FluentValidation. FluentValidation provides a fluent and expressive way to define validation rules and apply them to your API endpoints.
In this article, we will explore how to use FluentValidation in ASP.NET Core Web API to validate incoming requests effectively.
Prerequisites
Before to start you will need:
- Visual Studio Code with the C# extension.
- The .NET 7 SDK.
Note: Of course, you can develop with your favourite IDE as well. 🙂
What is FluentValidation?
FluentValidation is an open-source validation library for .NET applications, designed to provide a fluent and intuitive approach to defining and executing validation rules. It offers a declarative syntax that allows developers to express validation logic in a concise and readable manner. FluentValidation is not specific to ASP.NET Core and can be seamlessly integrated into a Web API project.
Now we will install FluentValidation.
Create a new project
- Create a new folder named IntroductionToFluentValidation.
- Open the created folder with Visual Studio Code.
- Open a new Terminal in Visual Studio Code.
- In the Terminal, run the following command to create a new ASP.NET Core Web API with .Net 7:
dotnet new webapi --framework net7.0- Install the FluentValidation NuGet package with the following command:
dotnet add package FluentValidation.AspNetCoreCreate a Validator
To apply validation rules to incoming requests, we need to create a validator class for each request model. Let's assume we have an API endpoint that is responsible for creating a new user. Below is an example that demonstrates how to create a validator specifically for the user creation request:
using FluentValidation;

public class CreateUserRequestValidator : AbstractValidator<CreateUserRequest>
{
    public CreateUserRequestValidator()
    {
        RuleFor(request => request.FirstName)
            .NotEmpty().WithMessage("First name is required.")
            .MaximumLength(50).WithMessage("First name cannot exceed 50 characters.");

        RuleFor(request => request.LastName)
            .NotEmpty().WithMessage("Last name is required.")
            .MaximumLength(50).WithMessage("Last name cannot exceed 50 characters.");

        RuleFor(request => request.Email)
            .NotEmpty().WithMessage("Email is required.")
            .EmailAddress().WithMessage("Invalid email address.");
    }
}
In the code above, we define validation rules for the CreateUserRequest model. The RuleFor method allows us to specify the property to validate and chain various validation rules.
Wiring Up FluentValidation
To enable FluentValidation in our project, we need to add the necessary configuration in the Program.cs file:
builder.Services.AddValidatorsFromAssembly(Assembly.GetExecutingAssembly());With AddValidatorsFromAssembly(), all the validators defined in the executing assembly will be automatically registered, eliminating the need to manually register each validator. This approach ensures that all validators are available for request validation within our project.
Applying Validation in Controller
Once we have set up FluentValidation, we can easily apply validation rules to our API endpoint:
[ApiController]
[Route("api/[controller]")]
public class UsersController : ControllerBase
{
    private readonly IValidator<CreateUserRequest> _validator;
    public UsersController(IValidator<CreateUserRequest> validator)
    {
        _validator = validator;
    }
To incorporate validation, we inject an IValidator<CreateUserRequest> into the controller's constructor. The CreateUserRequest represents the model or DTO (Data Transfer Object) that we want to validate.
    [HttpPost]
    public async Task<IActionResult> CreateUser(CreateUserRequest request)
    {
        // Validate the request using the injected validator asynchronously
        var validationResult = await _validator.ValidateAsync(request);

        // Check if validation fails
        if (!validationResult.IsValid)
        {
            // Optional: Improve error response by formatting validation errors
            // into a standardized format using the ValidationProblemDetails object
            var errors = validationResult.Errors
                .GroupBy(v => v.PropertyName, v => v.ErrorMessage)
                .ToDictionary(failureGroup => failureGroup.Key, failureGroup => failureGroup.ToArray());

            var details = new ValidationProblemDetails(errors)
            {
                Type = "https://tools.ietf.org/html/rfc7231#section-6.5.1"
            };

            // Return a 400 Bad Request response with the validation errors
            return BadRequest(new BadRequestObjectResult(details));
        }

        // Process the valid request...
        return Ok();
    }
}
Within the CreateUser action method, we invoke the asynchronous ValidateAsync method on the injected _validator to validate the incoming CreateUserRequest. This validation process checks whether the request data conforms to the defined validation rules.
If the validation fails, we have an optional step to improve the error response by formatting the validation errors into a standardized format.
To inform the client about the validation errors, we return a 400 Bad Request response using BadRequest(new BadRequestObjectResult(details)), where details contains the formatted validation errors in the response body.
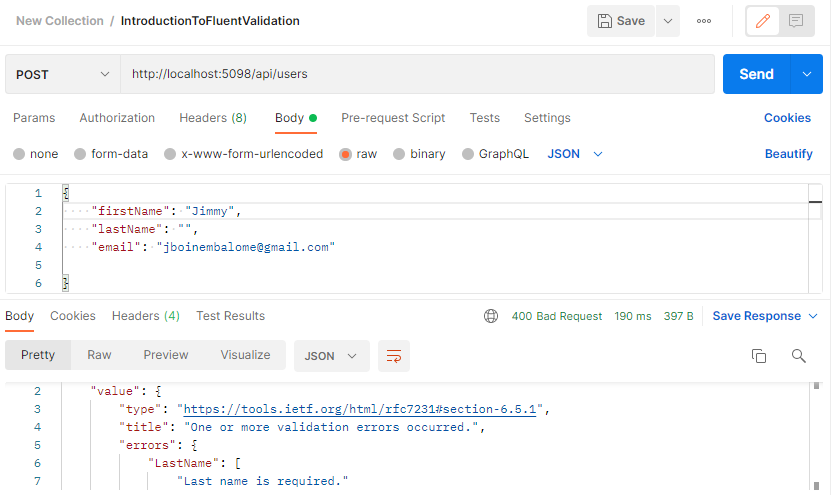
Testing the endpoint with Postman
If we attempt to execute the request without providing a last name, FluentValidation will indicate that the last name is required, as demonstrated in the Postman result:

Conclusion
FluentValidation is a powerful validation library for .NET applications. By leveraging FluentValidation, we can easily define and apply validation rules to our API endpoints, ensuring that incoming requests adhere to the specified criteria. By following a few simple steps, we can integrate FluentValidation into our projects and handle validation errors efficiently.
Source code of the article: Github source code
Thanks for reading! 🙂